
This blog is statically generated as I explained in my previous post. Now is time to deploy this website. We need 3 things: a place to store the content, a mechanism to serve the website as fast as possible and a way to make it accessible through a custom domain name.
Here is the rather classic solution I used, which works with any static website.
A place to store the files: S3
Amazon S3 is a web service that developers can use to store and retrieve data objects. Objects are stored in buckets, which are containers that hold an object or objects.

Serve the content fast: Cloudfront
To serve the content rapidly and optimise the experience of your users all over the world, having a S3 bucket is not fast enough: a bucket lives in a region and this region can be quite far away from your users. For instance, I put my bucket in Frankfurt but my users can be in the UK or the US given that my blog is written in English.
This is a perfect use-case for Cloudfront: Cloudfront is a web service that provides a CDN (Content Delivery Network) for your website, which means that Cloudfront will cache the files on servers around the world. The content for my readers in the UK will now be coming from a Cloudfront server located in the UK.

Make it accessible via your custom domain: Route 53 & AWS Certificate Manager
Having a great blog available on the internet is good, serving it fast is better but serving it under HTTPS with your own domain name is amazing!
Route 53 is a service of AWS that provides highly available, low latency web hosting. It can be used to create a custom domain for your website and then associate it with the AWS Certificate Manager service for free SSL certificates.


Tutorial
I will go through the steps that I made so that you can recreate this deployment.
Create the bucket
Once you have an account, go to the S3 console and create a new bucket. In our case, we call it "meyer-laurent-redeploy-tutorial".
Choose the name and zone as you like:


Activate the ACL (for integrating it with Cloudfront later)

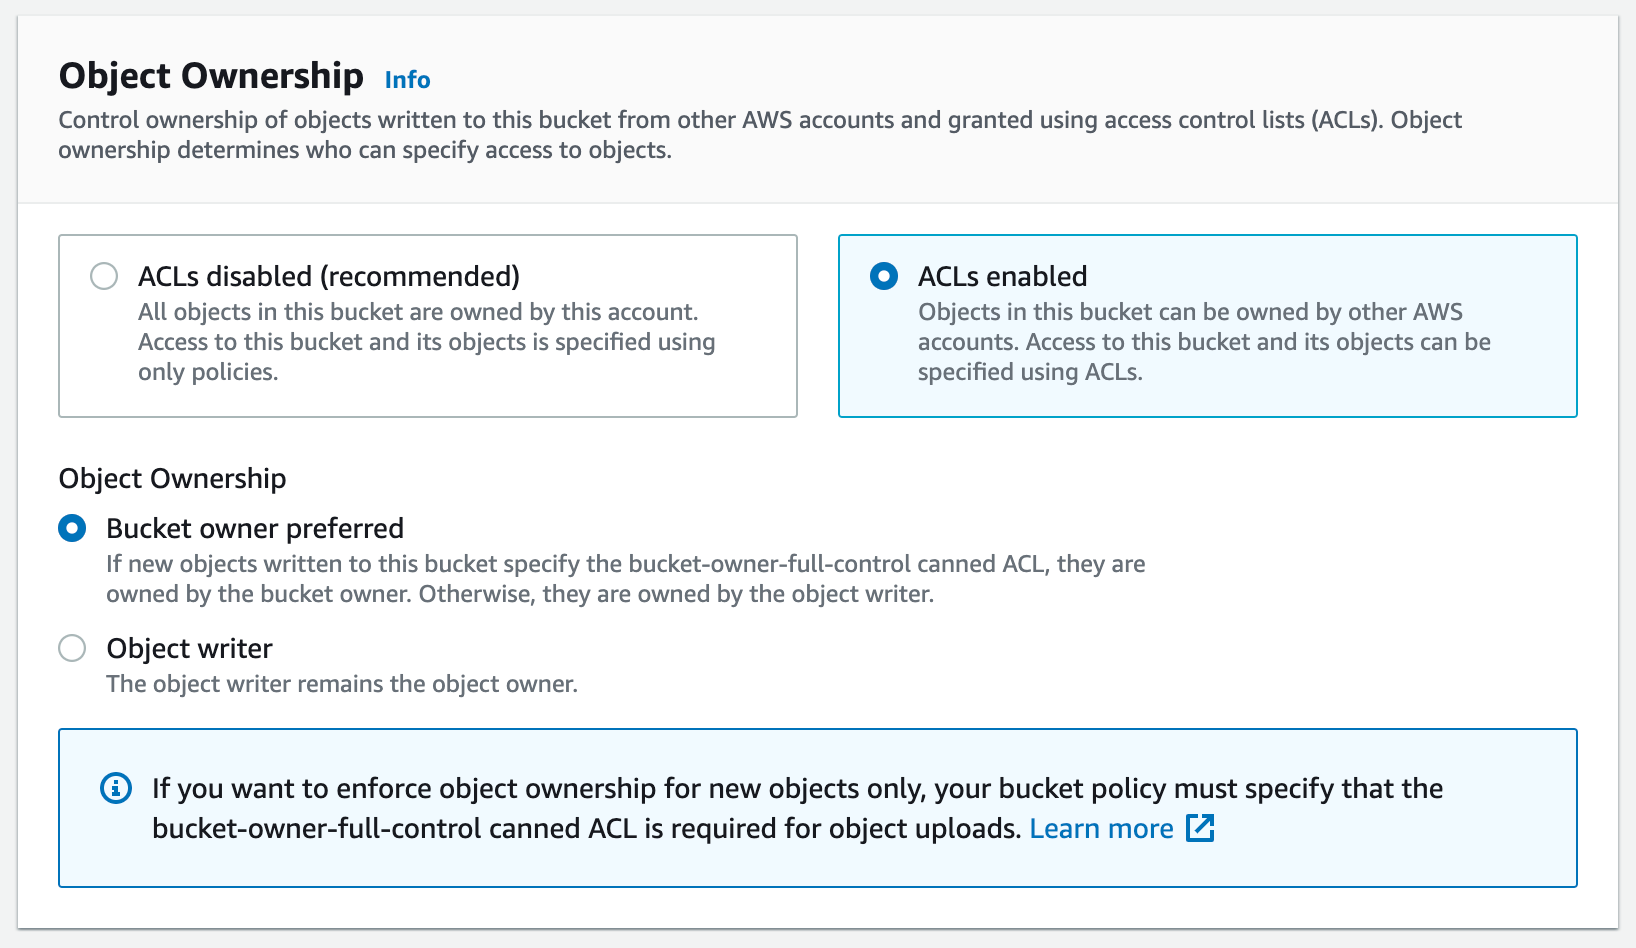
We need to let ACL User access the bucket and make it public so we need to the "Block Public Access settings for this bucket" policy like this:


All other settings do not matter much.
Make the bucket available on the internet
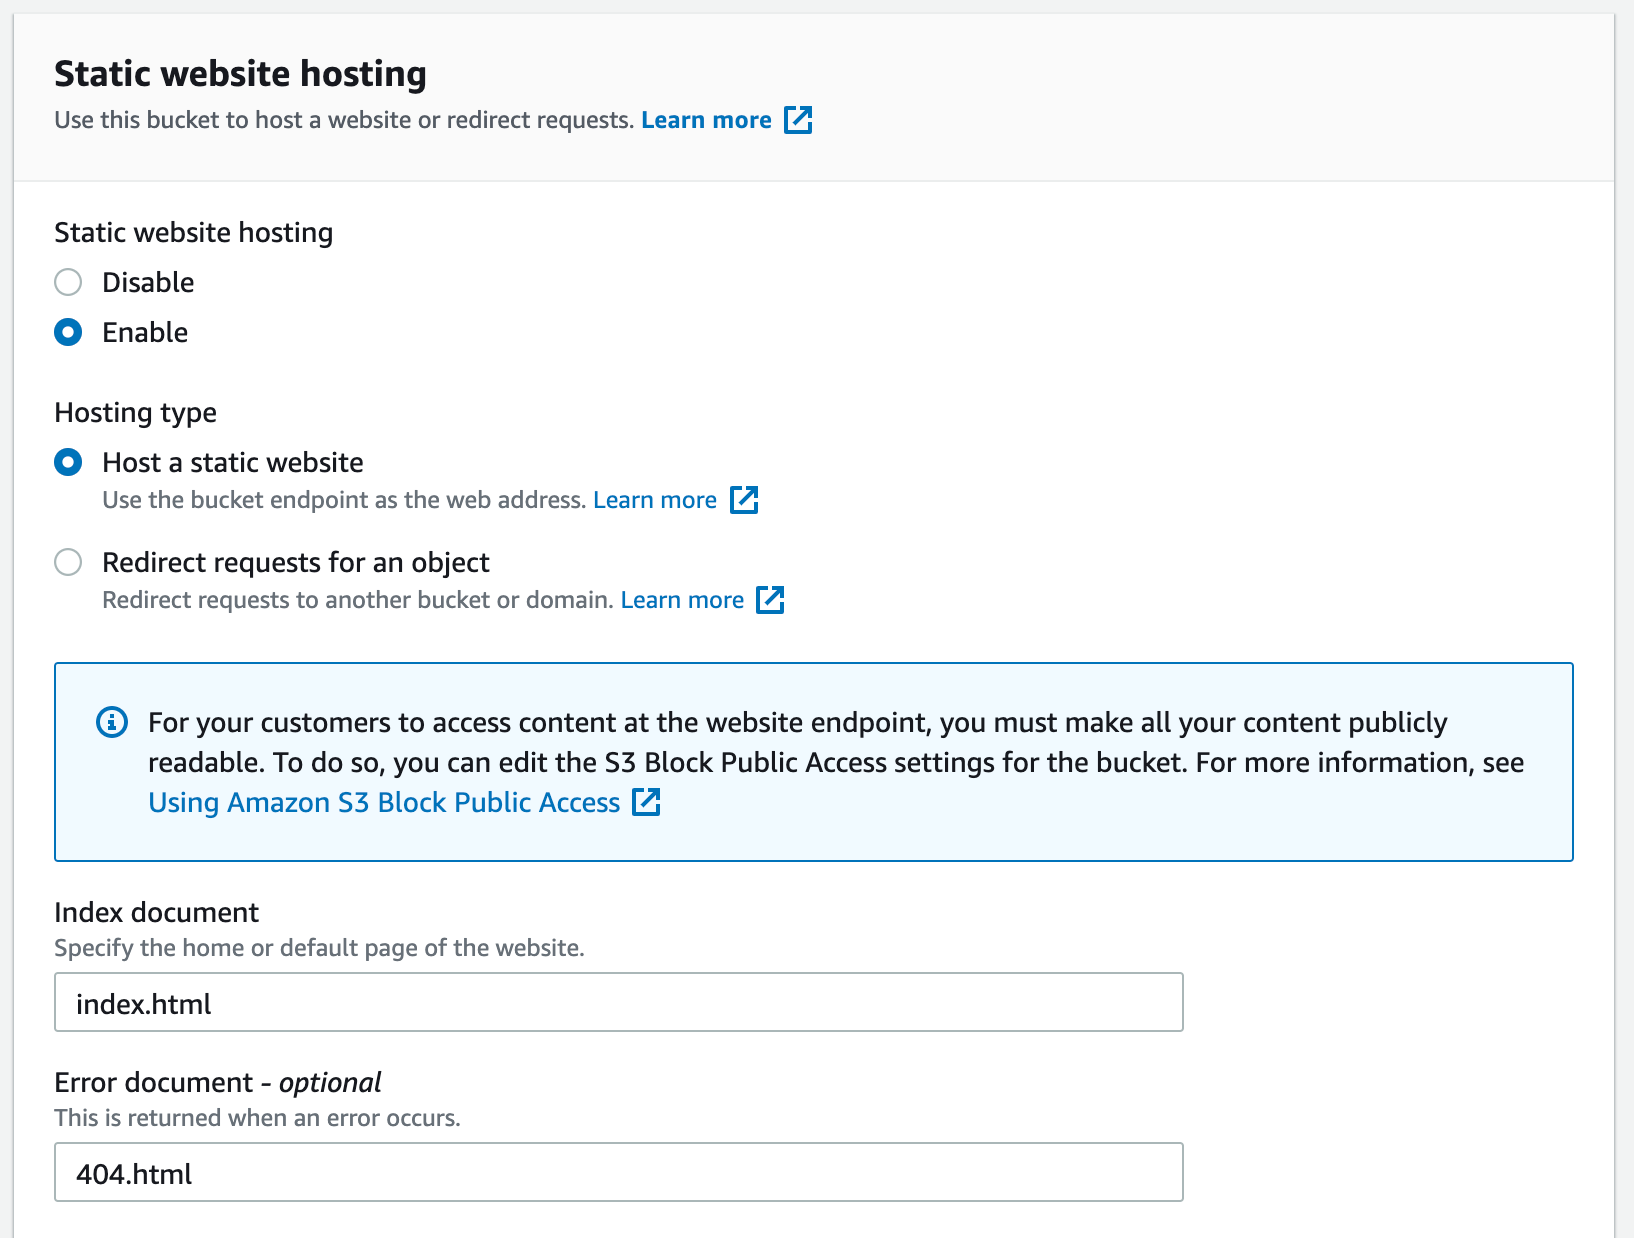
If you go to the properties of your newly created bucket, you will see an option at the end called "Static website hosting". It will allow our bucket to be available on the internet.


We need to edit and activate this option. Once this option is enabled, we can customise the home page and the not-found page. In my case, Next.js creates a home page called index.html and a not-found page called 404.html.

Once S3 knows that it needs to serve your website, we want to grant the right to external users to access your bucket from the outside world.
Go in the "Permissions" tab of your AWS bucket and edit the "Bucket policy".
Change it to something like this:
{
    "Version": "2012-10-17",
    "Statement": [
        {
            "Sid": "ReadAll",
            "Effect": "Allow",
            "Principal": {
                "AWS": "*"
            },
            "Action": "s3:GetObject",
            "Resource": "arn:aws:s3:::your-bucket-name/*"
        },
    ]
}
Upload the first version of your website
AWS provides you with a CLI, which is pretty handy. Once you have it properly configured and logged in, you can control all operations from the command line.
To upload your website to your bucket, you can proceed as follows:
cd <the root folder of your website>
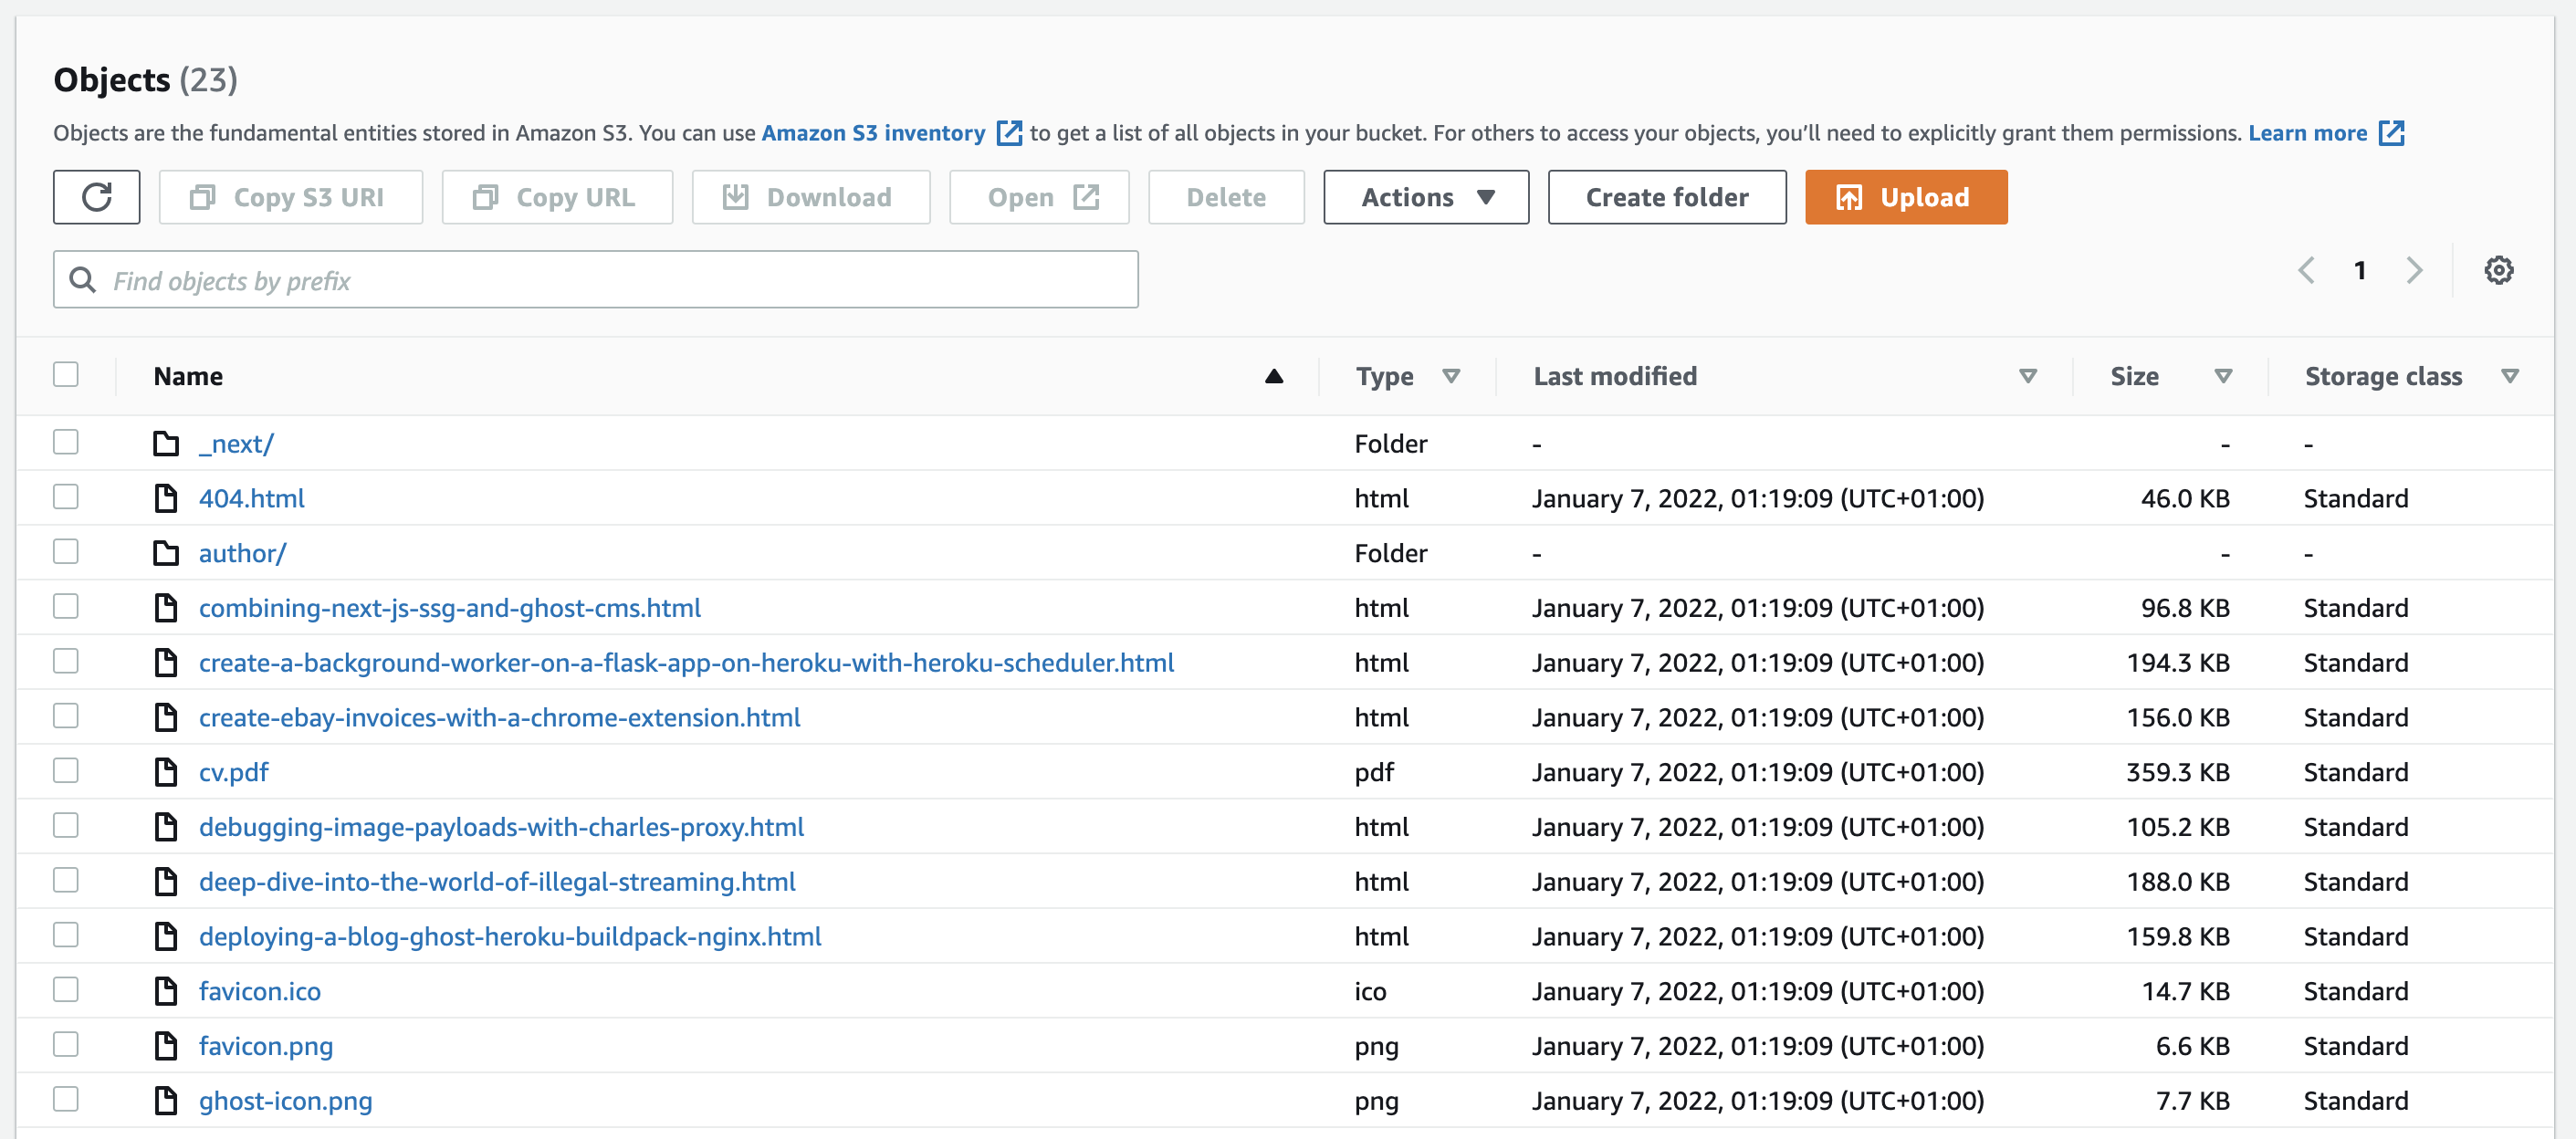
aws s3 cp . s3://<your bucket>/ --recursive --exclude "*/"
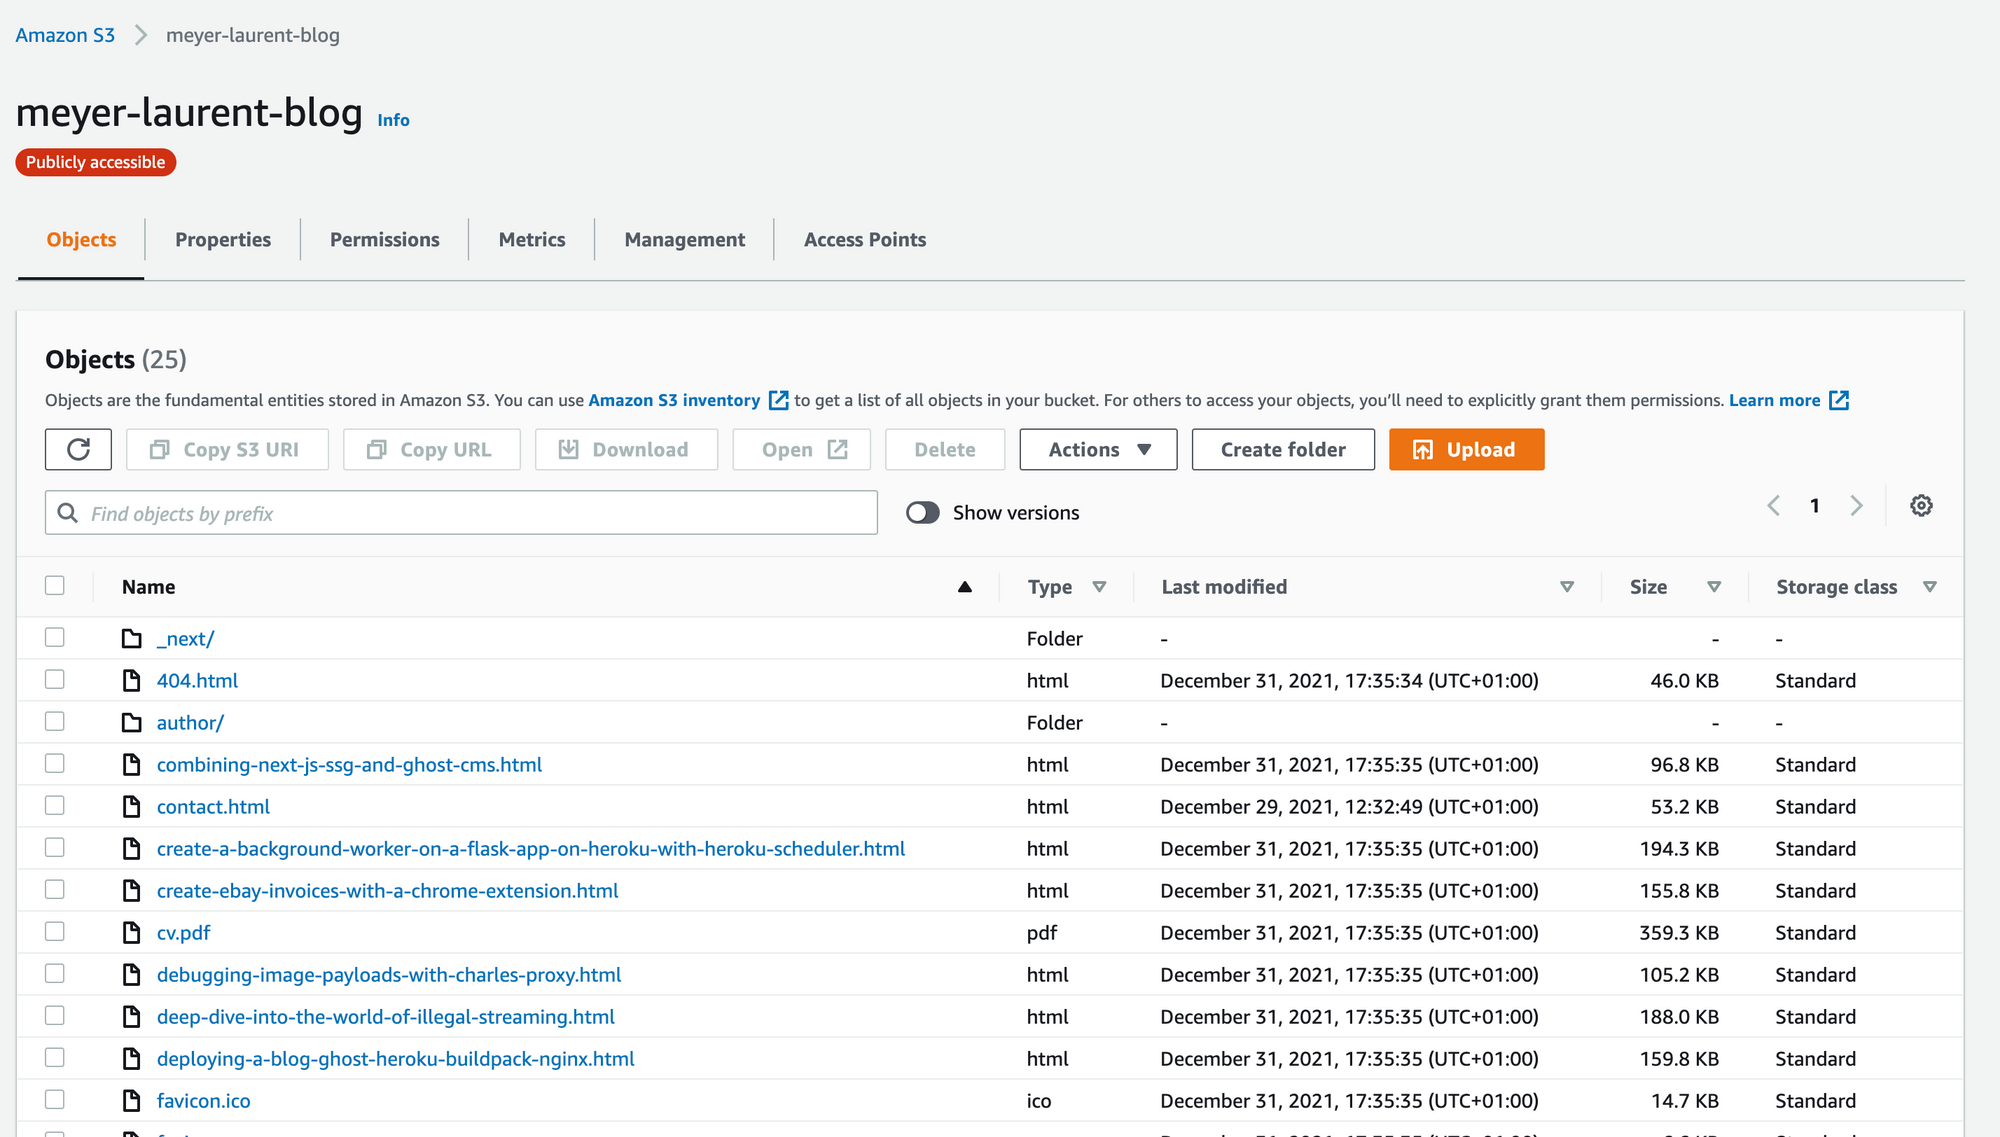
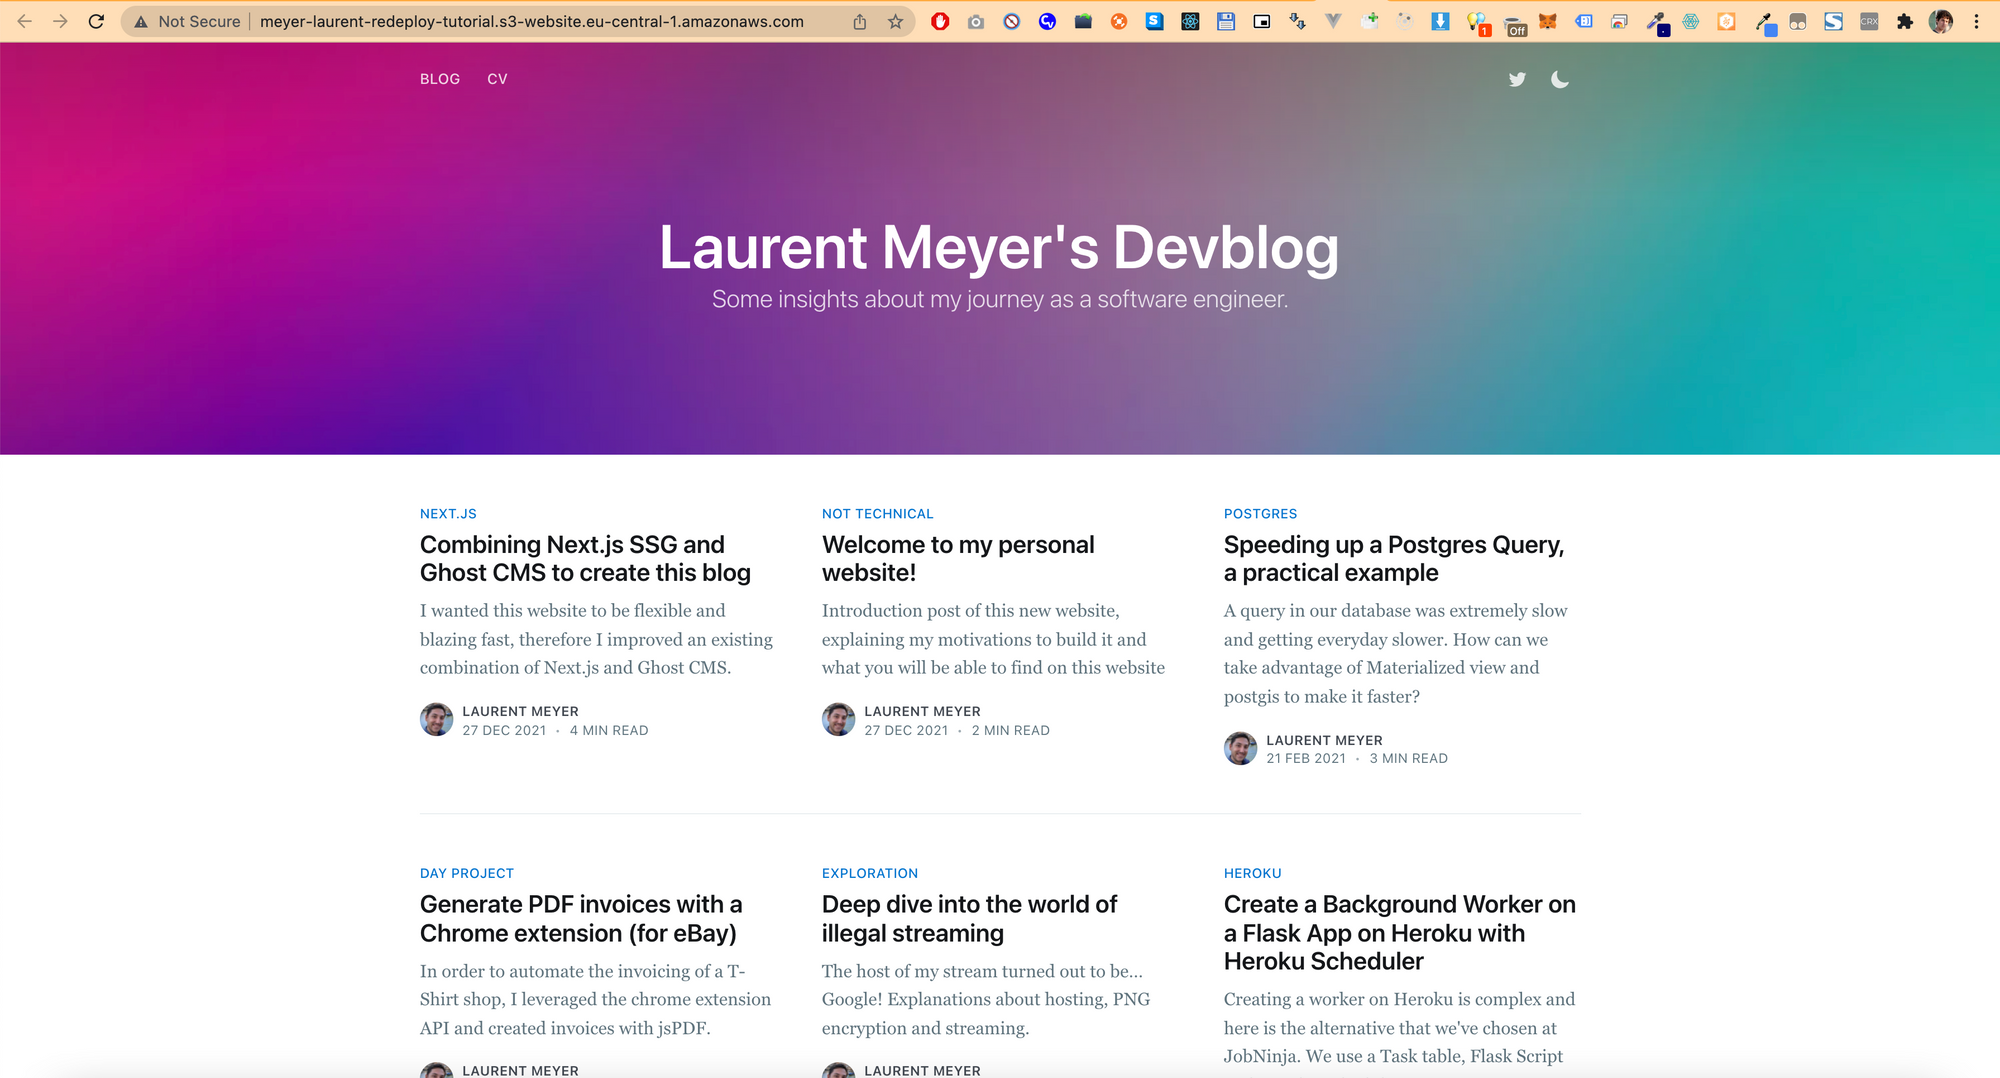
Once the command is completed, you should be able to see the content of your blog in your bucket:

But better than that, you should be able to see your blog online at the address:
http://<your-bucket-name>.s3-website.<your-region>.amazonaws.com/

Speed it up!
Right now, the website is delivered via S3, which means that a server in your chosen region will serve your website to all your visitors in the world. This is a good start, but we can do better. Let us use Amazon Cloudfront to speed everything up!
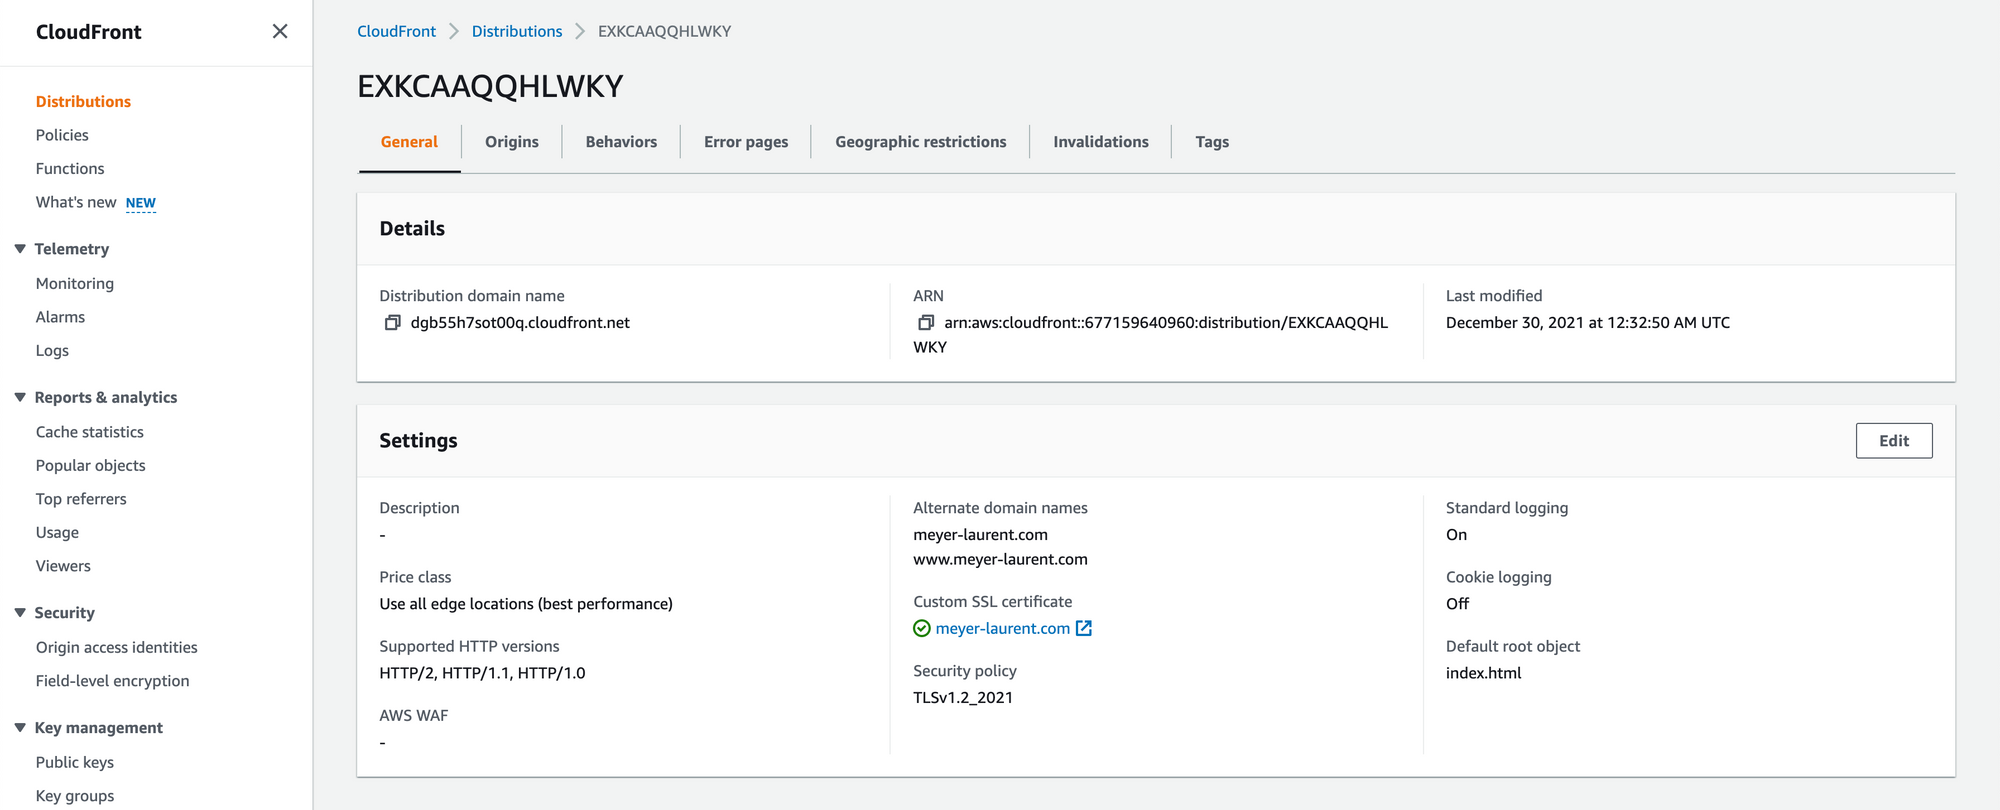
Go to your Cloudfront console and create a new distribution:

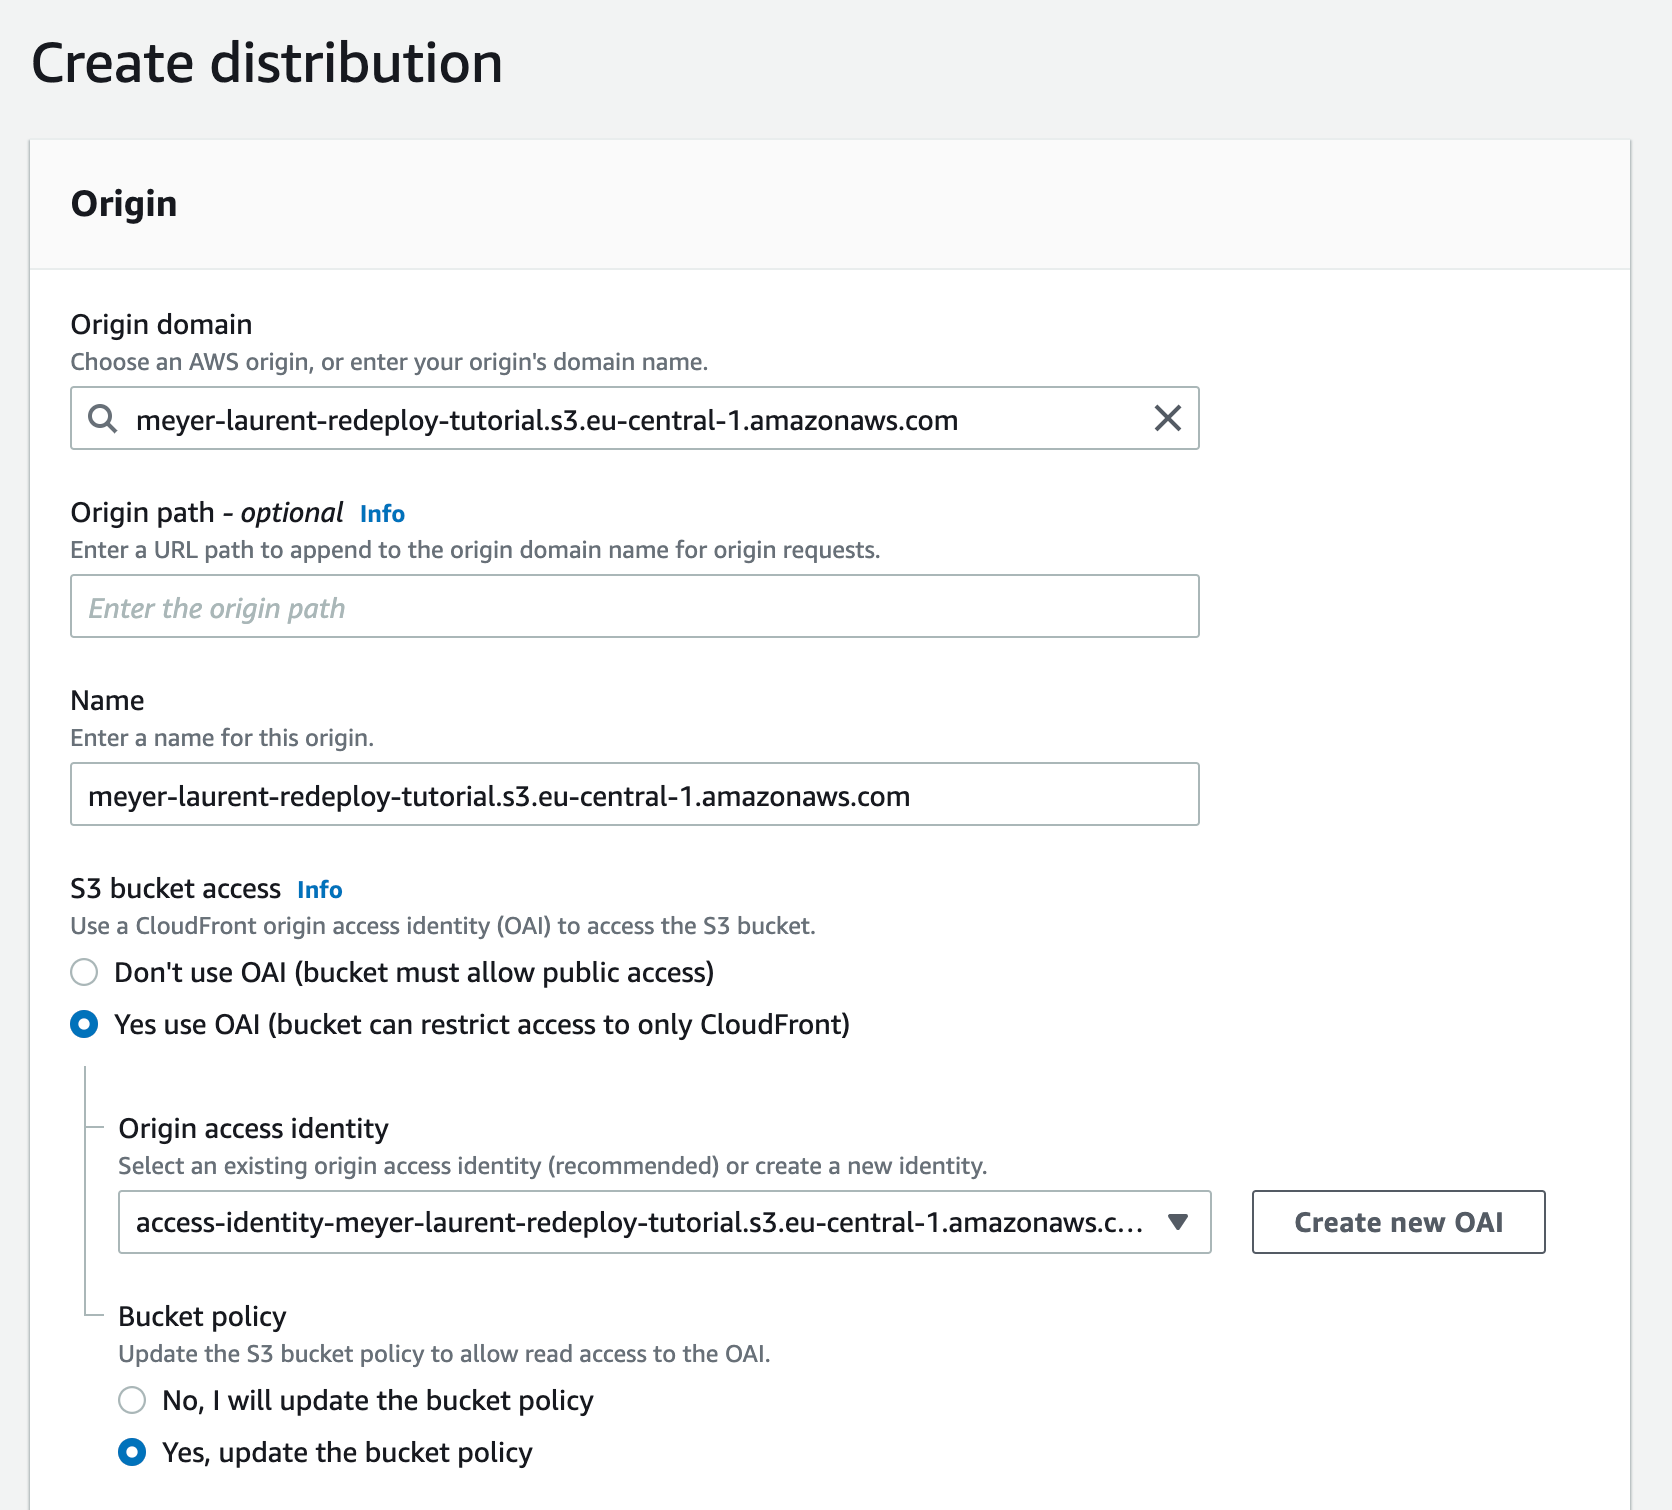
Some points worth mentioning:
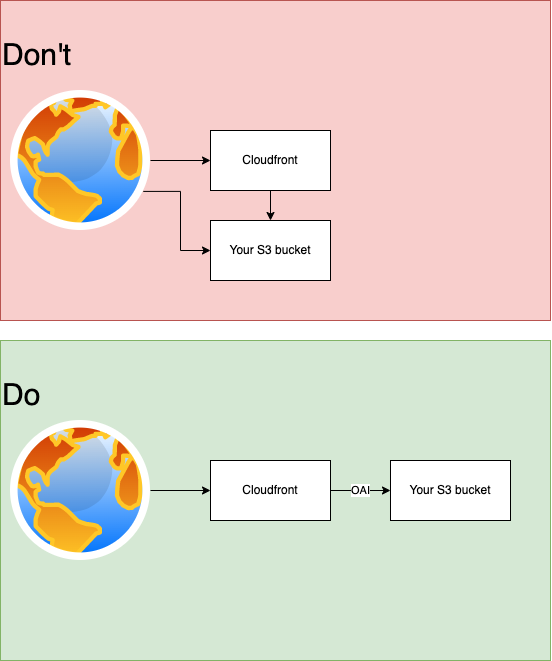
- OAI is useful for allowing Cloudfront to access your bucket. If you only allow Cloudfront to access the bucket, all security and networking will be managed by Cloudfront, which is safer than having two entrypoints.

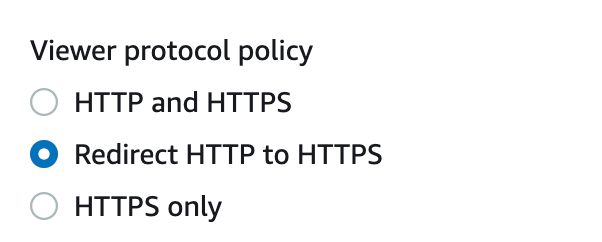
- I always redirect the HTTP requests to HTTPS. This seems to me to be the best compromise between security and usability.

- Do not forget to set a default root object else your website root will not be accessible (in my case
index.html):


If you click save, you will create a new distribution and your website will be available from one of the *.cloudfront.net addresses! For instance, you can access my blog through https://dgb55h7sot00q.cloudfront.net/.
Some small adjustments for my blog (optional)
Because the theme for this blog is based on some experimental features of Next.js (next export), I had to fix some issues with the router, since accessing a route directly without the .html suffix does not work.
Example: https://dvjx73xa22dxn.cloudfront.net/combining-next-js-ssg-and-ghost-cms cannot be accessed, while https://dvjx73xa22dxn.cloudfront.net/combining-next-js-ssg-and-ghost-cms.html can be accessed.
Cloudfront has a great concept for this called "Cloudfront functions", which are simple javascript functions that allow you to rewrite the query as you see fit. In my case, I wrote this little function:
function handler(event) {
    var request = event.request;
    var uri = request.uri;

    // Check whether the URI is missing a file extension.
    if (uri.length > 0 && !uri.endsWith('/') && !uri.includes('.')) {
        request.uri += '.html';
    }
    return request;
}
Change Bucket's access policy
As mentioned earlier, we need to change the bucket policy so that access to the bucket is only possible through Cloudfront. After this step, the bucket will no longer be available through https://meyer-laurent-redeploy-tutorial.s3.eu-central-1.amazonaws.com/index.html.
To do this, update the bucket permission policy from:
{
    "Version": "2012-10-17",
    "Statement": [
        {
            "Sid": "ReadAll",
            "Effect": "Allow",
            "Principal": {
                "AWS": "*"
            },
            "Action": "s3:GetObject",
            "Resource": "arn:aws:s3:::meyer-laurent-redeploy-tutorial/*"
        },
        {
            "Sid": "2",
            "Effect": "Allow",
            "Principal": {
                "AWS": "arn:aws:iam::cloudfront:user/CloudFront Origin Access Identity XXXXXXXXXXXX"
            },
            "Action": "s3:GetObject",
            "Resource": "arn:aws:s3:::meyer-laurent-redeploy-tutorial/*"
        }
    ]
}
to
{
    "Version": "2012-10-17",
    "Statement": [
        {
            "Sid": "2",
            "Effect": "Allow",
            "Principal": {
                "AWS": "arn:aws:iam::cloudfront:user/CloudFront Origin Access Identity XXXXXXXXXX"
            },
            "Action": "s3:GetObject",
            "Resource": "arn:aws:s3:::meyer-laurent-redeploy-tutorial/*"
        }
    ]
}
And if you refresh everything, the S3 URL: https://<bucket>.s3.<region>/<page> should not work anymore while the website should be still accessible via Cloudfront.
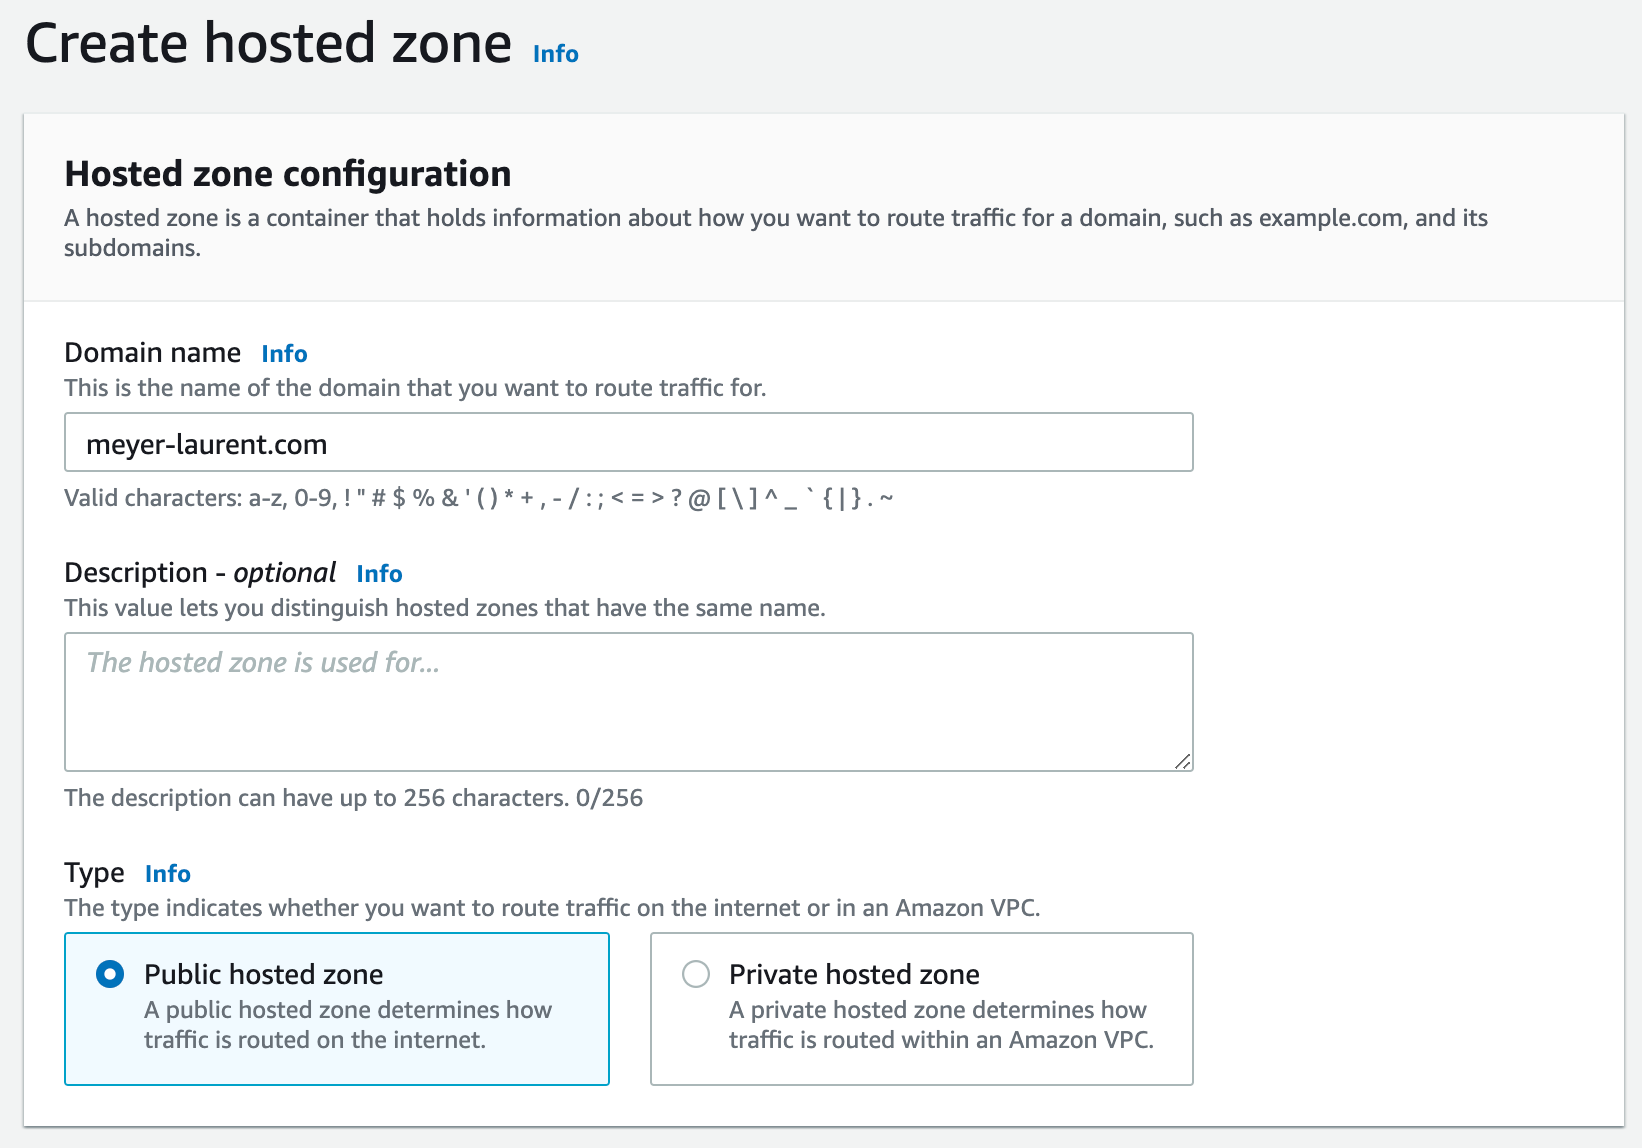
Create your hosted zone
Route 53 is AWS's DNS service. It greatly simplifies redirecting traffic to your website. It costs $0.5 per month per hosted zone, but for me it's an acceptable price to pay to have everything in one place. Maybe in another post I'll write about how you could use your distribution under a custom TLD without using Route 53.
The setup is pretty straightforward:
- Register your Hosted Zone with your TLD (i.e. meyer-laurent.com)

- Redirect the NS from your hoster to the ones of AWS Route 53, the targets servers are displayed here:


Bind Cloudfront and Route 53 together
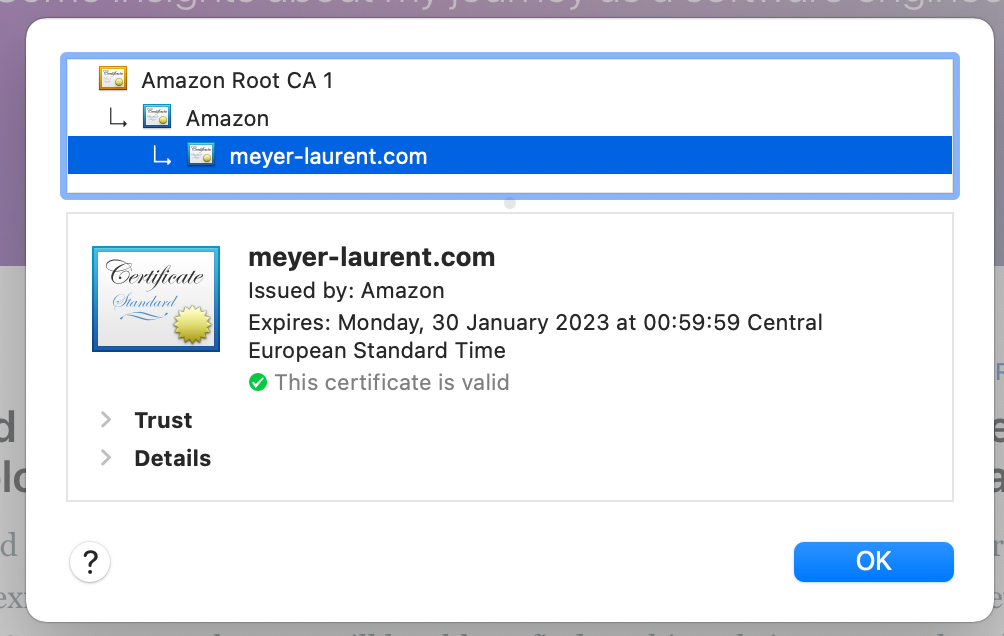
Once your domain entered the AWS galaxy, the only thing left to do is to connect Route53 with Cloudfront and manage all the certificate issues.
- First request a certificate via the Cloudfront console

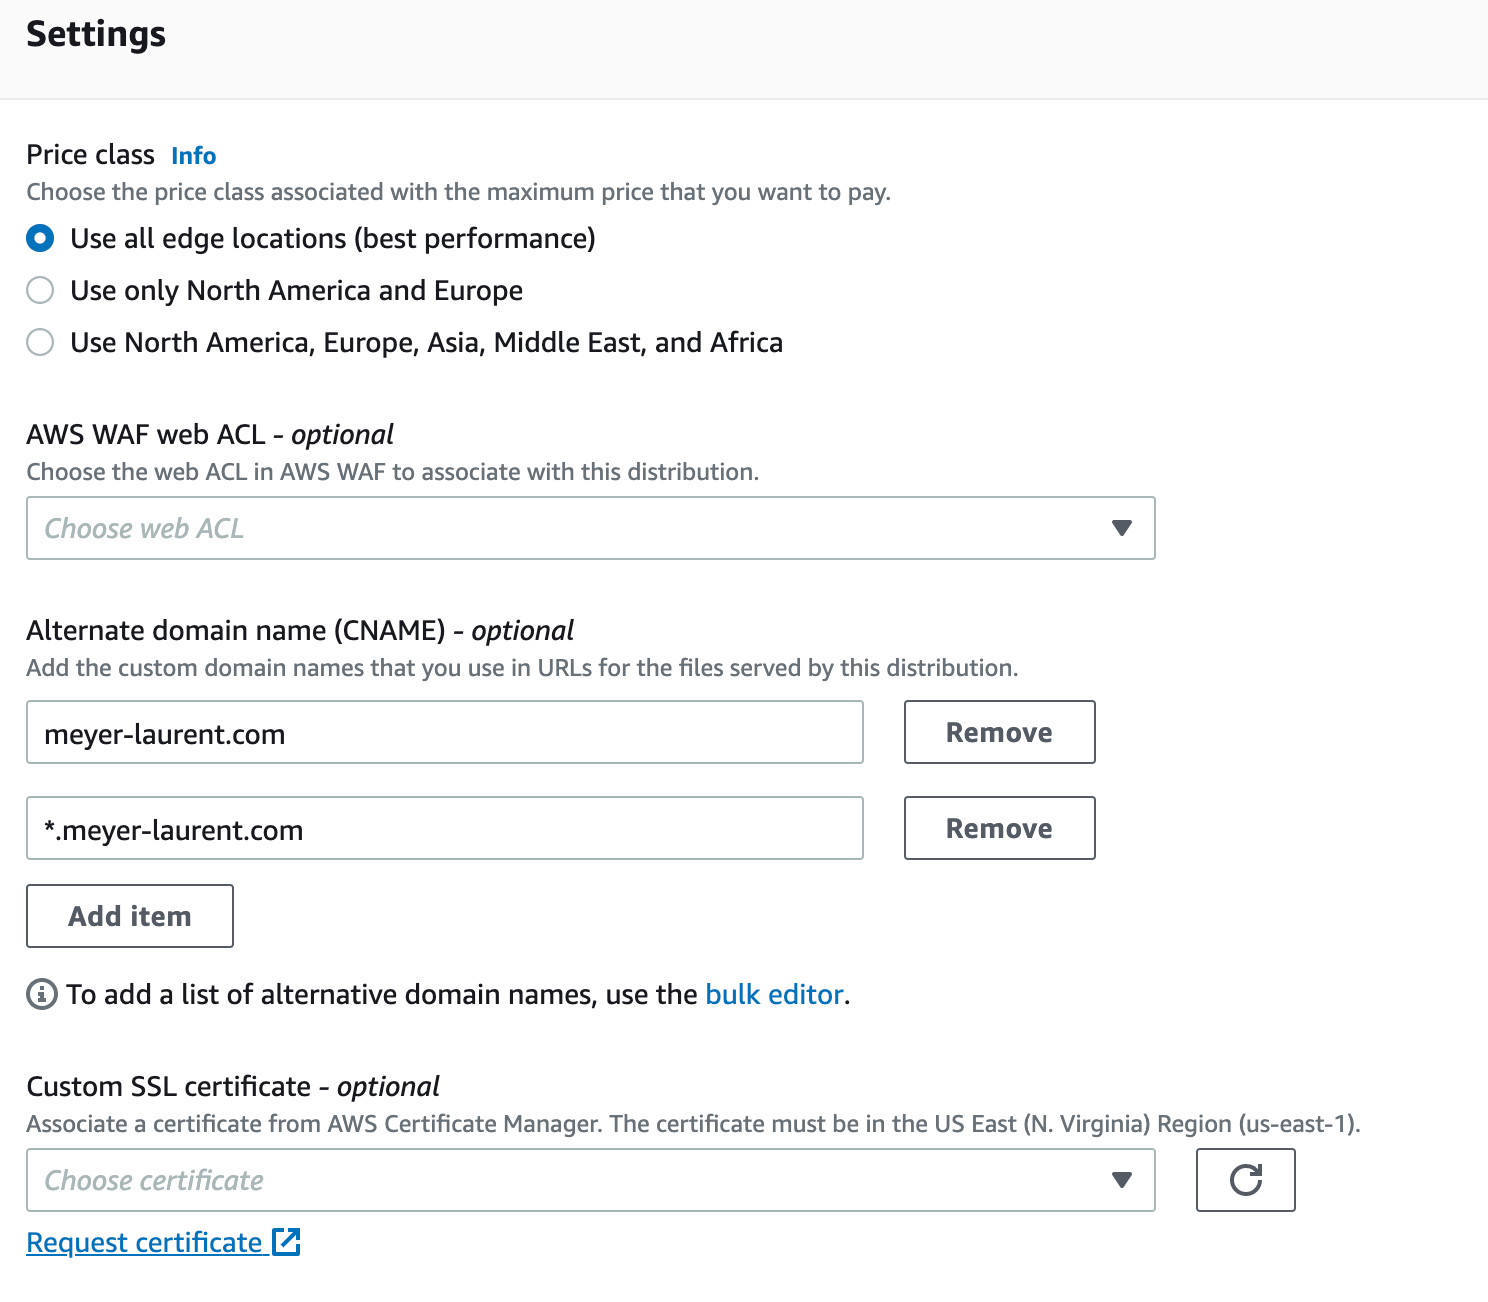
- Create the certificate and choose DNS validation method.

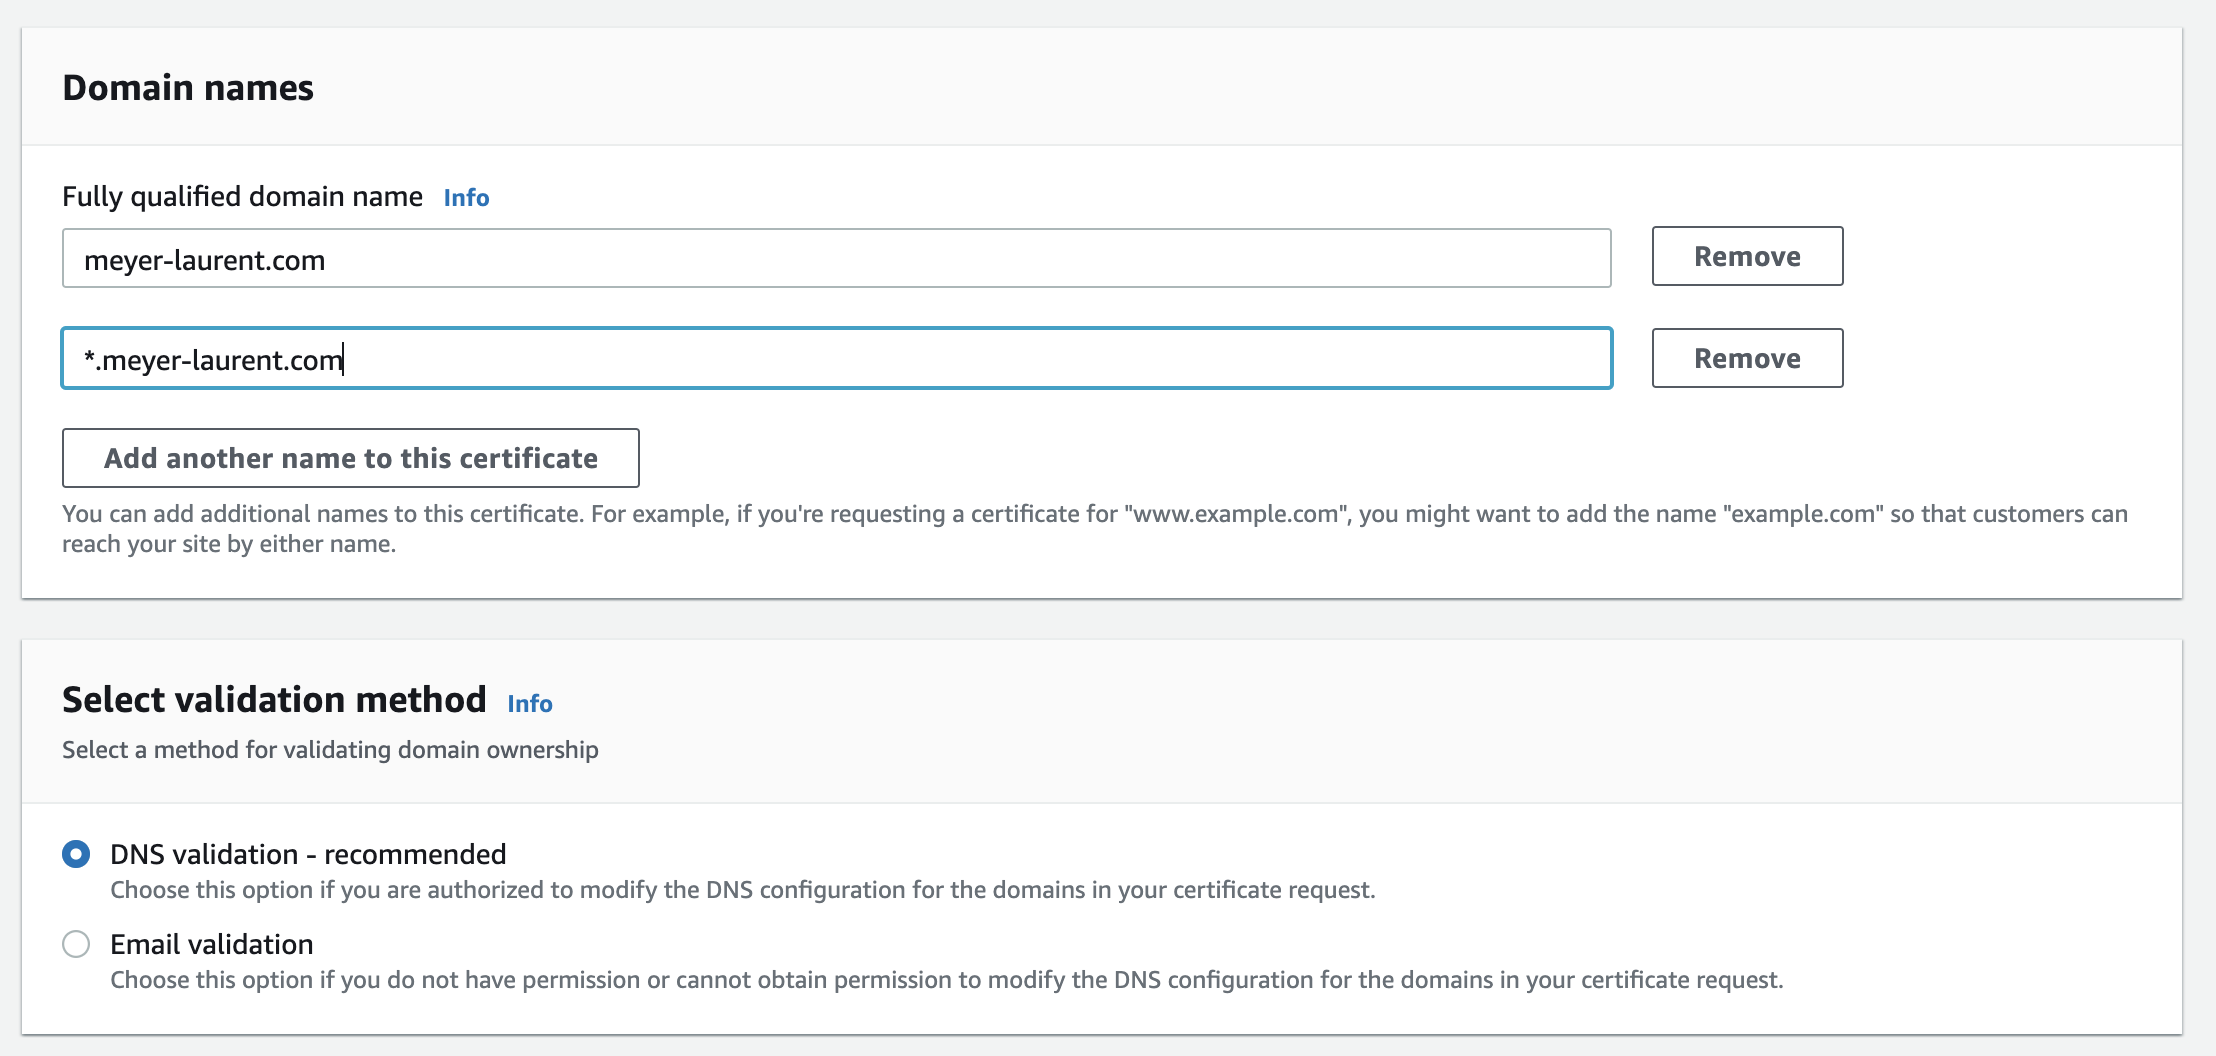
- Once you validate that step, you are able to copy the records directly in Route 53 without any copy/paste magic!

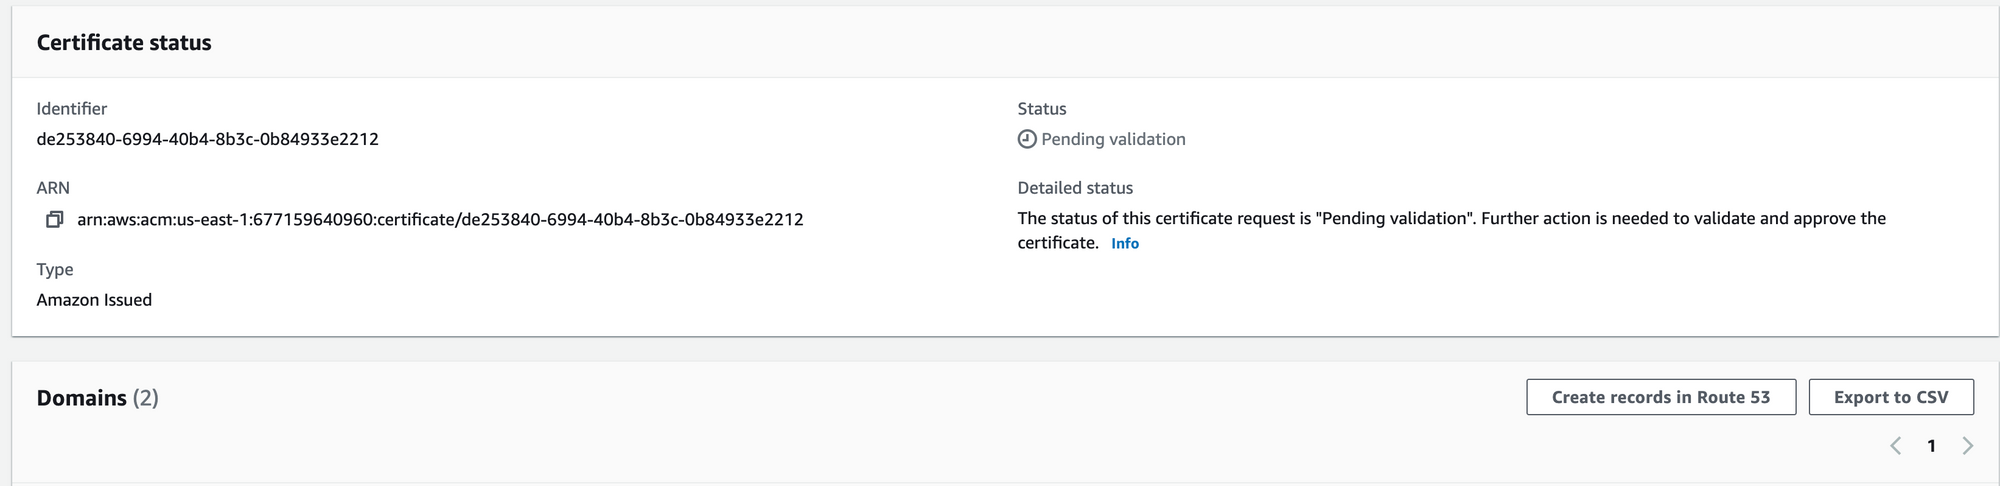
- Once the CNAME records are saved Route 53, your certificate should be issued and then your website should be online!!


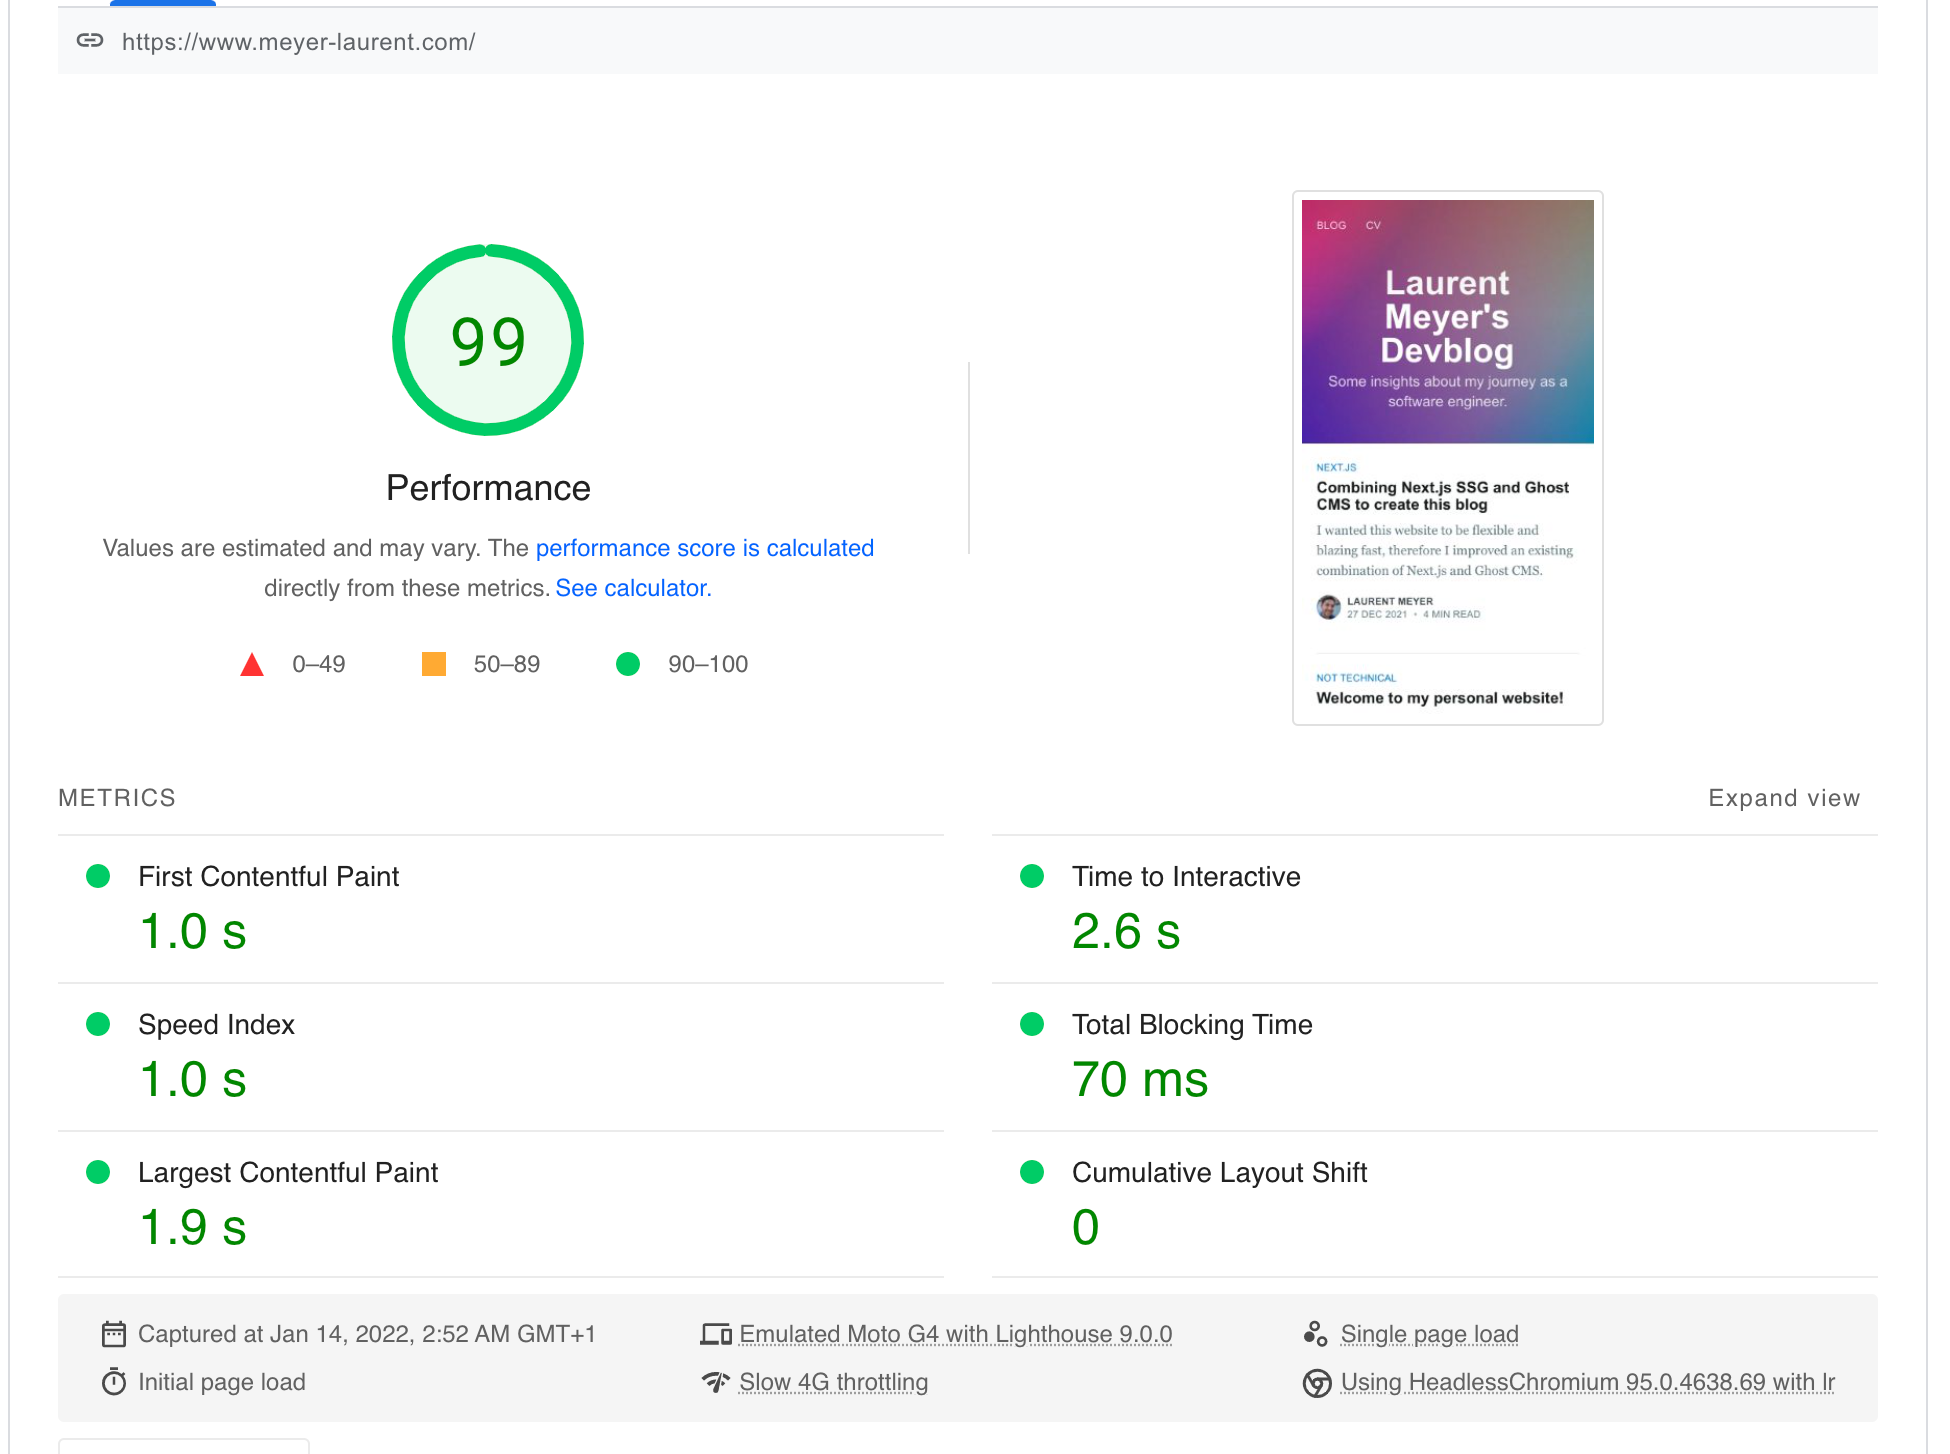
And it should be faaast!

Conclusion
In addition to successfully setting up my website, I also learned a few things that I may need in the future:
- S3 does not allow request rewrite, the easiest way to get this feature is to use Cloudfront.
- OAI allows to restrict access to your bucket to only your Cloudfront distribution.
- SSG is far superior in terms of speed to anything I have programmed before. The difference is still noticeable on modern hardware with a good internet connection and contributes to a great user experience. I will try to advocate it in the projects I work on.
- Deploying to AWS requires an understanding of their solution portfolio, but after a few hours it becomes clearer.